9.16 BUILD A WEB-BASED CLIENT PROJECT TO CONSUME OUR WEB SERVICE PROJECT
To consume our Web Service project, we can also build some Web-based client projects to call dif-ferent operations to perform related actions to our database. The structure of this Web-based client project is shown in Figure 9.98.
The Java Managed bean works as an interface to talk to Web Service to perform physical query operations to our Course Table in our sample database.
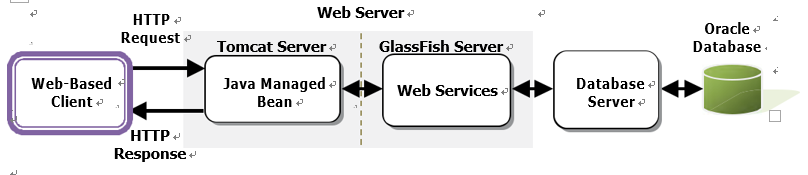
FIGURE 9.98 The architecture of our Web-based client project.
9.16.1 Create a Web-Based Client Project, WebClientCourse _ Select
To save time and space, we can modify one of our projects, JavaWebOracleCourse, we built in Chapter 8 and make it our new project. You can find this project on the CRC Press ftp site (refer to Figure 1.2 in Chapter 1), in the Students\Class DB Projects\Chapter 8 folder. You can copy and paste that project to your local folder. Before we can modify that project to make it our new client project, the following conditions are required:
1) Another popular Web server, Tomcat server, was used as a container for that project, so we need to install and add the Tomcat server to our new project before we can do modifica-tions to that project and make it our new client project.
2) Some JSTL cores with related embedded C tags were used for that project, that is, used for the view class Course.jsp file, so an associated JSTL library file should be installed and added into our new client project.
Now perform the following steps to build our new Web-based client project, WebClient Course _ Select.
1) Open NetBeans IDE 12.0 and the Services window, and expand the Servers folder. Currently only the GlassFish Server is displayed.
2) Right-click on the Servers folder and select Add Server item to open the Add Server Instance wizard.
3) Select the apache Tomcat or TomEE item from the Server list and click on the Next button.
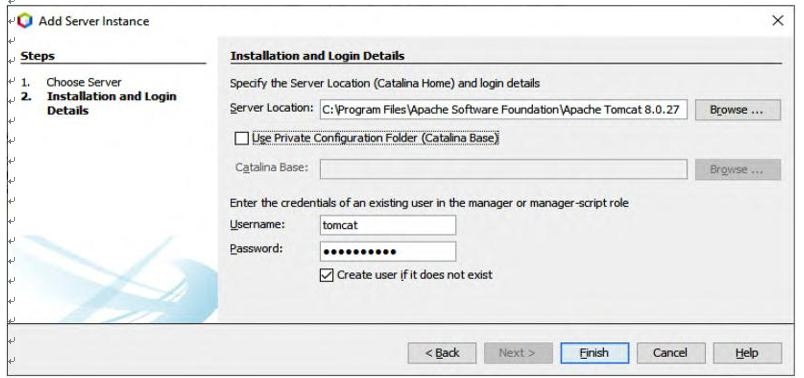
4) In the next wizard, click on the Browse button located on the right of Server Location box to locate our downloaded Tomcat 8.0.27 Web server from Section 8.4.2.1 in Chapter 8, which is C:\Program Files\Apache Software Foundation, select our Web server folder
Apache Tomcat 8.0.27 by clicking on it and click on the Open button to select this server.
5) You can enter any desired username and password into the Username and Password box if you’d like to get more protection for this server. In our case, just enter tomcat and oracle _ 18c into those two boxes as the username and password for this server.
6) Keep the Create user checkbox checked to generate the new user for this server. Your finished Installation and Login Details wizard is shown in Figure 9.99.
7) Click on the Finish button to complete the adding Tomcat Web server process.
8) Now open NetBeans IDE 12.0 and the Projects window, and browse to your local folder where the copied project JavaWebOracleCourse is located. Then right-click on that project and select the Copy item from the popup menu to open the Copy Project wizard.
9) Enter our new project name, WebClientCourse _ Select, into the Project Name box, browse to your local project folder as the Project Location and click on the Copy button. A new project, WebClientCourse _ Select, is generated and added into our Projects window.
10) Right-click on our new project, WebClientCourse _ Select, in the Projects window and select the Properties item to open the Project Properties wizard.
11) Click on the Run node under the Categories list, then click on the dropdown arrow on the Server combo box on the right, and select the Apache Tomcat or TomEE server.
12) Then go to the Relative URL box and change the starting page to /Course.jsp. Click on the OK button to complete adding the Tomcat server.
13) Finally we need to check and confirm that whether the JSTL library file, JSTL-1.2.jar, has been successfully downloaded and installed in our default folder, C:\Temp. If not, go to the site jstl-1.2.jar to download JSTL-1.2.jar file and add it to the C:\Temp folder. You do not need to add this library into our new project, since it was done by the original project.
Now let’s add a Web Service reference to our Web-based client project to allow it to use our Web service operations.